Tuesday, 29 September 2015

Blogger Basics (Tutorial) How to Create Blog on Blogspot

By 10:13
Due to Lot of changes day by day in Blogger.com interface and its features, it comes in my mind I should update this article for providing exact and updated information about how to create blog on blogger.com (blogspot) with new interface and tell you about its best features to get well experience and most out.
how to create blog on blogger

Blogger Basics

Launched in 1999, Blogger, Google Service, is a great way to create your own blog to start. Blogger completely free with free hosting.
Blogger is for:
To share your thoughts, photos, and more with friends and the world.
Easy to deploy text, images and videos and the Internet or from your mobile phone.
Unlimited resilience to customize your blog with themes, tools, and more. There is also some site which provides online blogging courses from which you will learn complete blogging, how do I blog and start make money from your blog with traffic and the help of SEO (Search Engine Optimization)

How to Create Blog on Blogger (Blogspot) New Interface

Step 1: Sign Up for a Google Account

You will need a Google account to build your own blog on Blogger. If you already have one, you do not need to create a new account, simply follow these steps.

Step 2: Go to Blogger.com then Sign In

how to create blogspot blog
How to create blog on blogger new interface
Just Simply Add Your Blog Title in the Title Field i.e. An Island for Blogging Tips and Tricks
and Insert Your blog URL address in the second field i.e. my-personal-photo .blogspot.com
In last select any theme from the templates section and click on the Create Blog Button.
finally you have created your free blog on blogger and thereafter its take you to Blogger dashboard. check the following screenshot
Blogger Dashboard New Interface

Enable Meta Description for  Blogger Blog

This is the major issue which is mostly avoided by newbie and they still don’t know what is it. but after lot of changes in Search Engines algorithm and SEO factors this information must be shared with all blogspot user to enable meta description for your blogspot blog and every post.
enable meta tags description in blogspot
How to enable meta tags description in blogspot
Note : After making enable this feature you can add meta description to your every blogger post from post settings.

How to Write Post in Blogger.com

Some newcomers still unaware how to create post in blogger because I have found and notified some blogger are creating pages instead of blog post. Check the above screenshots there is an orange button of New Post click on it and you will see the following page where you have to write your article or any post for your blog.
Create Post in Blogger
How to Create Post in Blogger new interface
As i have mentioned above about meta description, after enabling this feature as stated above, there will be another option in Post setting tab of Search Description where you have to describe search engines what you have written means a small description for search engines i.e. Google, Yahoo, Bing etc. about Your written post.
Creating Writing Tips for Blogging

Add Blog Description

You can easily add or change your Blog title and add brief description for your blog. Check this screenshot
Change Blog Title and Description in Blogger
How to Change Blog Title and Description in Blogger
Fix Duplicate Meta Description in Blogger

How To Create Page on Blogger

Check the Following Screenshot for creating pages on Blogger Blog.
create pages in Blogger
How to create pages in Blogger

Check Traffic Stats in Blogger Dashboard

For checking blog traffic you don’t have to use third-party tool or any other stats website, Just use your Blogger Dashboard and check all out stats of your blog. Go to Stats tab and check traffic sources, traffic per post, audiences location easily from single click.
How to Check Blogspot Traffic Stats
Best Analytic Tools for Website and Blogs
Read More...

How To Add Animated Flash Clock To Your Blogger Blog

By 10:11

Animated Flash Clock To Your Blogger Blog

Hello! `How are you guys? here's the cool Clock.this tutorial will show you how to Add animated flash clock gadget your Blogger blog. A clock gives a beautiful look to a website. A clock is a necessity for a personal website, forum, blog etc.Isn’t it exciting when you get a highly quality flash Clock absolutely Free? you can add this flash animated clock your blog easily.i've tested this Flash Clock on internet explorer, mozzilla firefox & many other web browsers. it's very fast and fresh.You simply have to copy the code below each clock and add it to your blog.


How To Add Aniamted Flash Clock Widget To Blogger?

  • Choose a type of clock below
  • Provide Require widget title
  • Fill Height and Width of the Widget
  • Click on "Genetate" button
  • Finally click on "Add to Blogger" to add it to your blog.

Add Animated Flash Clock To Your Blogger blog


Now let's start adding it...

Step 1. Login to Your Blogger Account.Go to your Blogger Dashboard.Click on Layout tab from left pane and click on Add a Gadget link.

Blogger Tips And Tricks|Latest Tips For Bloggers

Step 2. After click on Add a Gadget link A pop-up box will open now
with many gadget list, Choose HTML/JavaScript from the gadget options by clicking the blue plus sign for that gadget.

Blogger Tips And Tricks|Latest Tips For Bloggers


Step 3. Select 'HTML/Javascript' and add the one of code given below.

Step 4. Now Click On Save 'JavaScript' You are done.


Happy blogging!


Special Thanks http://flash-clocks.com

Picture From http://www.2dayblog.com/2009/10/19/manual-digital-clock/
Read More...

9 Tips To Reduce Blog Loading time

By 10:10
tips to reduce blog loading time
How to Optimize and Speedup Your WordPress Blog or Website
Today I am gonna discuss with you a most essential SEO factor which surely can help you to increase blog  ranking and boost blog traffic. Blog load time is most important SEO factor and every bloggers and webmasters should care their blog’s loading time and most of always try to reduce it. Because readers don’t like those sites which take too much time to load and than finally readers go to another website for searching the information. If your blog load faster than obviously many major search engine consider your blog as a good ranking especially Google. Reduce blog load time better helps for search engine and also your visitors/readers.

9 Tips To Reduce Blog Loading time

Below are some most important tips about how to reduce blog or wordpress loading time. Which you should consider and use it for better ranking.

How To Check Blog Or Website Loading Speed?

I have some best tool which you can check blog time speed and can improve performance.
Go to PageSpeed Insights and check blog load time.

1. Don’t Use Unnecessary JavaScript Coding:

Avoid using unnecessary JavaScript coding in blog it makes page load time slow Because it is so much heavy coding and can effect blog load time by a great margin. Most of newbie bloggers and webmasters use unnecessary widgets in their blog sidebar which is really harmful.

2. Choose Your Blog Template Wisely:

Select a clean and SEO friendly theme it is an amazing choice for blog. Before choosing a blog theme make sure that JavaScript usage not too much and don’t choose such type of blog theme which is already over designed.

3. Minimum Number Of Post On Blog Home Page:

Don’t show too much posts on blog homepage because it may possibility effect and helps to raise loading time. Always try to show 5 to 8 posts on homepage for better SEO ranking. If your website load faster than definitely readers will stay and glad. So avoid to show too much posts.

4. Avoid Too Much Optimize Images In A Single Post:

Relevant images in a single post is obviously play vital role for improve SEO ranking. But make sure 3 to 4 images is enough in a single post. Avoid too much use images per post because every image has use separate memory capacity.
Add Auto Image ALT Tag Generator for Blogspot Blogger

5. Use Resize Images:

Don’t forget to resize blog images with any resize image editor. Always Use JPG images because JPG images uses less size memory as compare to other images formats. To resize images use Photoscap or Photoshop.

6. Avoid To Display Too Many Ads On Blog:

I have seen most of newbie bloggers join many CPC networks program and implement all ads inside their blog which ads banner coded with JavaScript which full of use heavy size memory and can slow blog loading speed which is bad impact for SEO ranking. So please don’t use to many ads.

7. Avoid To Display Popup Ads:

There are dozens of blog sites which are exists in Google search engine who are display popup ads in their blog to increase earning. But as I recommended, It is a bad way to increase revenue. I have seen many time that such blogs or websites are not loaded, But it is hang by popup advertising campaign. So totally avoid to display it.

8. Avoid To Use Unnecessary External Links:

In case you are using stats counters widget to check blog traffic and also use website welcome widget in blog site. You may use Google analytic tools instead of stats counters widget and you have to remove unnecessary website welcome widget into blog.

9. Avoid to Using Unnecessary Social Media Buttons:

Social media buttons is most important which helps blog to increase traffic. Social media sites also help us to connect with world. But you may remove unnecessary social media buttons.

Final Words:

Read More...

How to Create Blog on Blogger (Blogspot) New Interface

By 10:07

Step 1: Sign Up for a Google Account

You will need a Google account to build your own blog on Blogger. If you already have one, you do not need to create a new account, simply follow these steps.

Step 2: Go to Blogger.com then Sign In

how to create blogspot blog
How to create blog on blogger new interface
Just Simply Add Your Blog Title in the Title Field i.e. An Island for Blogging Tips and Tricks
and Insert Your blog URL address in the second field i.e. my-personal-photo .blogspot.com
In last select any theme from the templates section and click on the Create Blog Button.
finally you have created your free blog on blogger and thereafter its take you to Blogger dashboard. check the following screenshot
Blogger Dashboard New Interface

Enable Meta Description for  Blogger Blog

This is the major issue which is mostly avoided by newbie and they still don’t know what is it. but after lot of changes in Search Engines algorithm and SEO factors this information must be shared with all blogspot user to enable meta description for your blogspot blog and every post.
enable meta tags description in blogspot
How to enable meta tags description in blogspot
Note : After making enable this feature you can add meta description to your every blogger post from post settings.

How to Write Post in Blogger.com

Some newcomers still unaware how to create post in blogger because I have found and notified some blogger are creating pages instead of blog post. Check the above screenshots there is an orange button of New Post click on it and you will see the following page where you have to write your article or any post for your blog.
Create Post in Blogger
How to Create Post in Blogger new interface
As i have mentioned above about meta description, after enabling this feature as stated above, there will be another option in Post setting tab of Search Description where you have to describe search engines what you have written means a small description for search engines i.e. Google, Yahoo, Bing etc. about Your written post.
Creating Writing Tips for Blogging

Add Blog Description

You can easily add or change your Blog title and add brief description for your blog. Check this screenshot
Change Blog Title and Description in Blogger
How to Change Blog Title and Description in Blogger
Fix Duplicate Meta Description in Blogger

How To Create Page on Blogger

Check the Following Screenshot for creating pages on Blogger Blog.
create pages in Blogger
How to create pages in Blogger

Check Traffic Stats in Blogger Dashboard

For checking blog traffic you don’t have to use third-party tool or any other stats website, Just use your Blogger Dashboard and check all out stats of your blog. Go to Stats tab and check traffic sources, traffic per post, audiences location easily from single click.
How to Check Blogspot Traffic Stats
Best Analytic Tools for Website and Blogs
Read More...

Add Cute Custom Facebook Like Box To Blogger

By 10:06

How To Add a Custom Facebook Like Box to Your Site
Facebook Like Box is very useful widget to show visitors the authority and love of the people for his blog. Facebook offers a simple Like Box plugin that you can easily integrate into your website But the default Facebook like box is not having good look at ugly all. This tutorial will show you How To Add Cute Custom Facebook Like Box using CSS To Blogger. Facebook Like Box is the best way to get more fans on Facebook. A Fan Box allows great attract your Blog more visitors or readers to like your Facebook fan page not leaving the like go here. you don't need to do any think you only need to copy and paste the code. Im Sure that this Cool Customize Facebook Like Box With CSS widget attracts your facebook fans increase the count of Likes.


How To Add a Custom Facebook Like Box to Your Site


Now let's start adding it...

Step 1. Login to Your Blogger Account.Go to your Blogger Dashboard.Click on Layout tab from left pane and click on Add a Gadget link.


Blogger Tips And Tricks|Latest Tips For Bloggers

Step 2. After click on Add a Gadget link A pop-up box will open now
with many gadget list, Choose HTML/JavaScript from the gadget options by clicking the blue plus sign for that gadget.


Blogger Tips And Tricks|Latest Tips For Bloggers

Step 3. Select 'HTML/Javascript' and add the one of code given below.

Step 4. Now Click On Save 'JavaScript' You are done.
Read More...

Die Blogspot-Grundlagen: Das Dashboard

By 10:03
Blogger: das Menü

Auf der "Startseite", Ihrem Dashboard, finden Sie in der linken Menüleiste alle wichtigen Funktionen:
  • Der erste Punkt "Neuer Post" führt Sie direkt zum Textfeld für einen neuen Blogeintrag. Mehr dazu im nächsten Absatz.
  • Posts: Hier finden Sie alle Blogeinträge in einer Liste und können ältere Posts bearbeiten, löschen und von der Webseite nehmen oder sich die Zugriffszahlen der einzelnen Artikel ansehen.
  • Seiten: Fügen Sie verschiedene "Seiten" ein, können Sie Ihren Blog in Abschnitte gliedern. Der Unterschied zwischen "Seite" und "Posts" besteht lediglich in der Anordnung: Seiten sind nämlich (je nach Layout) im linken oder oberen Menü angeheftet.
  • Kommentare: Einzelne Blogeinträge können von Usern kommentiert werden. Die Kommentare müssen Sie hier freischalten.
  • Google+: Ihr Blog ist mit Ihrem Google-Plus-Account verknüpft. Alle neuen Beiträge werden dort automatisch gepostet, dies können Sie hier jedoch auch deaktivieren.
  • Statistiken: Wer hat wann von wo mit welchem Gerät Ihren Blog angesehen? Unter "Statistiken" finden Sie es heraus. Wird der Blog fast nur von Smartphones angesehen, sollten Sie die Inhalte auch für die mobile Ansicht optimieren.
  • Einnahmen: Gute Blogs sind eine kleine Geldquelle, zumindest wenn Sie Werbung schalten. Wie Sie dazu vorgehen, lesen Sie hier.
  • Layout: Menüs, den Header und viele Gadgets für Ihren Blog können Sie hier ändern. Tolle Features von Facebook, twitter und Co stellen wir Ihnen in den nächsten Absätzen vor.
  • Vorlage: Die Vorlage konnten Sie bereits bei der Erstellung des Blogs auswählen – jetzt können Sie dies noch einmal ändern und ins Detail gehen. Schriftart, Farben, Hintergrund und auch das HTML-Skript des Blogs ändern Sie in diesem Abschnitt.
  • Einstellungen: Einen Vertipper im Namen können Sie hier ebenso leicht ändern wie die Blogbeschreibung und die Blog-URL. Zudem bestimmen Sie hier die Anzahl der Posts auf der Startseite, nehmen Einstellungen zu den Kommentaren vor und können die Blog-Beschreibung für Google eintragen.
Read More...

Tutorial: Mit Blogspot einen neuen Blog erstellen

By 10:02
Blogspot-Tutorial

Als erstes müssen Sie natürlich einen Blog erstellen. Haben Sie dies bereits getan, können Sie zum nächsten Abschnitt springen.
  • Melden Sie sich bei Google an oder erstellen Sie einen neuen Account. Anschließend müssen Sie Blogger öffnen.
  • Dort erstellen Sie über "Neuer Blog" eine neue Website, für die Sie noch einen Hintergrund und ein Layout auswählen müssen. Beides können Sie später jedoch wieder ändern.
  • Geben Sie noch einen Blog-Namen ein und klicken Sie auf " Blog erstellen"
Read More...

Sunday, 27 September 2015

Privacy and permissions

By 10:51
By default, your blog is completely public, and can be read by anyone on the internet. However, if you want to keep it private, you can do that, too. You can change these settings on the Settings | Basic tab.
Permissions and Privacy
  1. Under the 'Blog Readers' section, you'll probably see 'Anybody' selected as the default. When you change this to 'Only these readers,' you'll get an Add Readers button.
  2. Click the Add Readers button and then enter the email address of a person to whom you'd like to grant access to your blog. To add multiple people, separate their addresses with commas.
  3. For each address entered, the Google Account associated with that address will be given access to view your blog. If an address is not associated with an account, that person will receive an invitation email with a link allowing them do one of three things:
    • Sign in to an existing account.
    • Create a new account.
    • View your blog as a guest (no account required).
Read More...

Customize

By 10:50
Your template is a fun way to customize your blog. When creating a new blog, you're first asked to choose a default template, this is the basic design of your blog. You can choose from many templates for your blog; simply pick the one that best fits your needs.
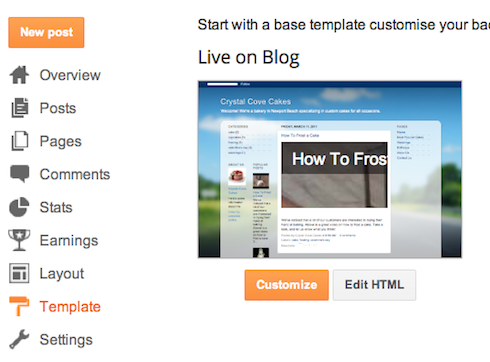
Template" Once on the Template tab, you can either click on the orange Customize button to get started with our easy-to-use WYSIWYG (“What you see is what you get”) template designer, or choose one of our many default templates. If you’d like to edit the HTML of your blog, just click the gray Edit HTML button.
In addition, you can customize your blog's design using our intuitive drag-and-drop interface. You can also add powerful gadgets such as slideshows, user polls, or even AdSense ads. If you want more precise control over your blog's layout, you can also use the Edit HTML feature. To edit your blog's layout, follow these steps:
  1. Click Layout from the drop-down menu on your dashboard below the blog you would like to customize.
  2. From there, click Edit to edit existing gadgets, or Add a Gadget to add new ones.
  3. To add a new gadget after you've clicked Add a Gadget, simply click the plus sign next to your desired gadget. You can choose from gadgets by category, or search for a specific gadget in the top right of the pop-up window.
  4. add_gadget
  5. Once you've added the necessary information to your selected gadget, click the orange Save arrangement button. Your layout changes will appear instantly.
Read More...

Write your post

By 10:50
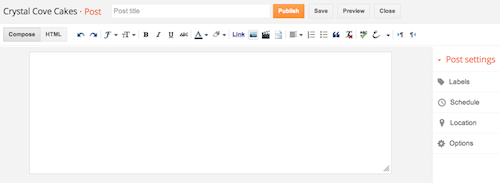
Once you've signed in to Blogger, you'll see your dashboard with your list of blogs. Here's what you need to do:
  1. Click the orange pencil icon to write a new post, and enter anything you want to share with the world.
  2. Next, you'll see the Post Editor page. Start by giving your post a title (optional), then enter the post itself:
    New post
  3. When you're done, click the Preview button at the top to make sure it's ready to go, and then click the Publish button to publish your post.
Back to top

Add an image

You can add an image from your computer or the Web to your blog. Click the image icon in the Post Editor toolbar. A window appears prompting you to browse for an image file on your computer, or enter the URL of an image on the Web.
Once you've selected your image, you can then choose a layout to determine how your image will appear in your post:
  • The 'Left', 'Center', and 'Right' options allow you to customize the way your blog text will flow around your image.
  • The 'Image size' options will determine how large the image will appear within your post.
Click UPLOAD IMAGES to add your image, and then click DONE when the notification window appears telling you that 'Your image has been added.' Blogger will then return you to the post editor, where you'll see your image ready to be published to your blog.
You can also publish images to your blog using your mobile device, Google's free photo software Picasa, or a third-party service like flickr.
Back to top

Add a video

To add a video to your blog post, click the film strip icon in the Post Editor toolbar above where you compose your blog text. A window appears prompting you to 'Add a video to your blog post.'
Click Browse to select the video file from your computer that you'd like to upload. Note that Blogger accepts AVI, MPEG, QuickTime, Real and Windows Media files and that your video must be less than 100MB in size.
Before uploading your video, add a title in the 'Video Title' box and agree to the Terms and Conditions (you'll only have to do this the first time that you upload a video with Blogger). Then click UPLOAD VIDEO.
While your video uploads, you'll see a placeholder in the post editor showing where your video will appear. You'll also see a status message below the post editor letting you know that your upload is in progress. Depending on the size of your video, this usually takes about five minutes. When it is complete, your video will appear in the post editor.
Read More...

Blogger Getting Started Guide

By 10:49

Dashboard


Your Dashboard, as always, is your starting point. This is where all your blogs are listed, and you can click on the icons next to them to perform various actions on each blog, such as:
  • Writing a new post: Just click on the orange Pencil icon on your Dashboard to access the Post Editor.
  • Viewing your posts: The gray Post List icon will take you to a list of your published and drafted posts for a specific blog.
  • Catching up on your favorite blogs: Below the list of your own blogs, you’ll see a list of the blogs you follow with an excerpt from their latest posts.
  • Everything else: Check out the drop-down menu next to the Post List icon for a quick link to:
    • Overview
    • Posts
    • Pages
    • Comments
    • Stats
    • Earnings
    • Layout
    • Template
    • Settings
Note that the Earnings tab will only show if AdSense supports your language.
Back to top

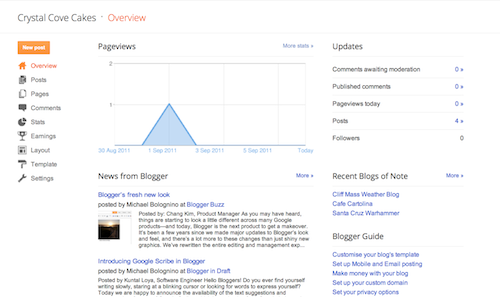
Overview

Overview
On the Overview tab, you can see your blog’s activity, news and tips from the Blogger team, and recent Blogs of Note.
Read More...

The Cost of Web Hosting Is Less Than $4 Per Month

By 10:47
Choosing the right hosting company is far from simple. Although all hosting companies might seem the same, some are slower than others, some have bad customer service and others are quick to scam you out of your money while offering horrible services.
The internet is also cluttered with thousands of people who recommend bad hosting companies. Individuals who do this are some times even paid by companies to write fake reviews about their services.
For this reason, I only speak from experience and recommend web host that I have used myself for many years without any complaints. The two web hosts that I recommend for beginners are Bluehost and HostGator. I use these two hosting providers to power nearly all of my online sites. The only two exceptions are my larger sites that I host with either WebSynthesis or WPengine. As you can see, I only recommend web hosting services that I actually use.

Creating Your Website: How It Works

Note that we focus on utilizing the WordPress content management system.

wordpress.orgWordPress is a content management system or software that allows website owners to manage their site, add custom graphical elements, layouts, and more without needing to know any code. WordPress is the easiest to learn, most used website software in the world for blogging, e-commerce, and much more.
With WordPress you do not need to hire a web designer or design a layout yourself. Instead you can purchase predesigned web layouts or themes. WordPress website themes cost a fraction of time and money that you would spend designing a layout yourself or hiring a web designer. Another major advantage of WordPress is the fact that the software is installed on your website, and can be accessed online through any computer.
The layout of a WordPress site is customizable, however by default all WordPress sites come with a default graphical theme. If you wish to change the main WordPress layout, you can download new themes for free or buy one of thousands of WordPress themes available for purchase. Finally, before you start building your blog, let’s discuss the necessary steps to becoming an authority blogger.

How to Setup Your Blog

In this simple step-by-step website building process, you are going to work through purchasing your hosting, installing WordPress, installing the theme of your choice, then securing your new website.
For this tutorial, I will use the Genesis Framework and a Genesis Theme. If you decide to use another WordPress theme (not Genesis), then you will follow a similar approach with the theme of your choice.
If you are ready, let’s get to work!

Tools That You’ll Need

Read More...

Creating Your First Website

By 10:46
In this guide, I will discuss the overall process that is involved in creating a website. This article is specially useful for those who wish to make a website, yet they lack the knowledge and the guidance to start the website of their dreams.
In this website setup guide, I will discuss some of the requirements needed prior to launching your site, how to buy a domain name and much more.
Unlike many people believe, with today’s simple technology, making a website is easier than ever and does not really require programming skills. Another misconception revolves around website expenses. In reality setting up a website with a personal domain can be as cheap as 3 to 4 dollars a month.
So if you wish to join the millions of business owners, bloggers, and other people who have set up their websites successfully, this guide will help you by guiding you every step of the way.

Setting Up Your Site

There are two fundamental parts of setting up your website and publishing it online:
1. Buying a domain name (example: www.blogbasics.com)
2. Purchasing web hosting services
Get your free domain name with Bluehost when you purchase hosting for only $3.95 per month
Once you have these two elements your site will be online and available for the world to see. However, before we get there, we must understand domain names and web hosting.

domain extensionsWhat Are Domain Names?

A domain name is the Uniform Resource Locator (URL) or website address of your site. Think of Google.com, Facebook.com, Twitter.com; all of which are domain names.
In order to set up your site you will have to purchase (also known as register) a domain name that has never been registered before or is currently available.
For example, a website owner closed down his or her website and the domain name is waiting for someone to “reactivate” it or purchase it for personal use. With this in mind, follow these tips when you are ready to buy your domain name.
Read More...

Getting Started with Blog Basics

By 10:46

Definition of a Blog

In order to build a successful blog, we must first understand what the term blog really means.
The definition below is what I will discuss most often on Blog Basics:
A blog is a means of communication used to examine a topic that often consists of written text, video, audio or other ways to exchange information.
Now, that we’ve level set, let’s dive in and discuss specific tactics for setting up your blog.

Build a Self-Hosted Blog

Why You Should Build a Self-Hosted Blog

Many people decide to use a free hosting service when they initially start blogging. There are several free hosting platforms and new platforms continue to be released.
Two of the most popular free hosting platforms are Blogger.com and WordPress.com. You may decide to use one of these free hosting platforms initially and that’s fine. However, if you’re serious about building a popular blog, I don’t suggest utilizing one of the free hosting providers.
When you use Blogger.com, WordPress.com or any of the other free hosting platforms, they almost always add their domain name to the preferred domain name of your website.
Here is an example: If I had decided to use WordPress.com for Blog Basics, the domain name would be blogbasics.wordpress.com instead of blogbasics.com.
The result of using a free hosting service is a less professional domain name that is likely more difficult to remember for your audience. You will also have fewer options to customize your blog with limited plugins, themes, design options and monetization opportunities.
The only way I would recommend using a free hosting provider is if you only plan to blog for fun. This means that you have no intention of ever building a business around your blog or monetizing your blog. If there is even a remote possibility that you eventually want to have a serious blog, then I suggest you build a self-hosted website.
Free setup & domain for only $3.95 per month – professional Bluehost web hosting
Below is a walkthrough of the steps that you will need to complete to setup a self-hosted WordPress.org website. I only recommend using WordPress.org due to simplicity, customization options and ongoing support. It’s easily the best self-hosted blogging platform available.
Read More...

Find domain name and web hosting provider

By 10:45
To set up a self-hosted WordPress blog, you’ll need two things:
Domain name – This will be your personal blog address where people find you over and over again. For example Google’s Domain is www.Google.com. Your new blog domain name will be www.YourBlogName.com, except you’ll choose what’s going to be behind YourNewBlog. The cost of a domain name is usually $10/year.
Web hosting – This will be the home of your blog address and content that’s on the blog. Without web hosting, you’ll be unable to use your domain. Think of it as a computer hard drive that stores all your content. The cost of web hosting is usually somewhere between $2-5 per month.
It’s less than an XL coffee at Starbucks, so it won’t break the bank. But it’s an important investment to your blog success.

Where should I get my domain name and hosting?

There are hundreds of different web hosting companies like BlueHost, GoDaddy, iPage and so on…
They all offer you a similar service with a similar price, but after managing dozens of blogs and experiencing a ton of headaches with hosts, I now only use and recommend www.HostGator.com for domain names and web hosting. 
My blog hosting performance
But if you want, you can always go with another web host as long as it’s reliable, secure and with unlimited storage & bandwidth. That way you won’t run into troubles later on.

How do I choose a good domain name?

Choosing a bad domain name is one of the most common mistakes I see bloggers make. Be sure you choose a domain name that is…
1. Easy to Remember – Don’t choose a nonsense name, something tough to spell, or a long name full of dashes. “www.best-tech-gadgets-in-the-world.com” won’t ever stick in someone’s head, but something like “www.techgeeks.com” rolls off the tongue.
2. Unique and Descriptive – You want a name that reflects who you are and what you care about. Be creative and build an identity you’re excited about!
3. Trustworthy – Domain extensions like “.com”, “.org” or “.net” are the most popular, with “.com” being the one most people think of first. Try to avoid crazy extensions like “.rocks” or “.biz”, as these are less commonly used, tougher to remember and not as trusted.
Read More...

Make a decision: non-hosted or self-hosted WordPress?

By 10:45
 Image result for Make a decision: non-hosted or self-hosted WordPress

In short, there are two types of blogs – free blogging (non-hosted) services and self-hosted blogs. WordPress is no different than others. I’ll explain you the difference in a second, but first have a look at this chart:

SELF-HOSTED BLOGFREE BLOGGING SERVICES
Your blog address (URL, WWW.)Your blog address will look professional and neat. You’ll be able to set up your own domain name like: www.YourNewBlog.comYour blog address will look like: tumblr.com/yourblog or yourblog.blogspot.com. Hard to remember and not really something you’d trust as a visitor, right?
Who controls your blog content?The only one who controls and moderates your blog is you. No-one will be able to remove/edit your content, you decide what you publish.Your blog content is controlled and owned by the free blogging service provider. If they think it’s against their TOS (which can happen), they can take down your blog without any warnings. All your hard work and time put on the blog can disappear within seconds.
How about monetization?You decide which ads to place, which products/services to sell. You can even set up an email subscription.Not really. On a free blogging platform, you’ll have some limitations. For example; “Selling ad space or running Adsense are prohibited on free blogging services.”
Customisation?You’ll have access to over 1,500 free themes/layouts and over 2,000 free plugins. You won’t run out of features.Limited. Fewer plugins and themes to choose from (around 100). If you want more themes and plugins – you’ll need to pay as it’s only for Premium users.
Sample blogs?
  • www.SmartPassiveIncome.com
  • www.MichaelHyatt.com
  • www.reciperifle.blogspot.com
  • www.jessica.wordpress.com
What about the cost?Domain name: $10 / year
Web Host: $2 – $4 / month
Free, but if you reach 25,000 monthly visitors, you’ll need to start paying.
How about bandwidth and storage?Depends on your web hosting company, but it’s usually unlimited.3GB for free (no videos, though).

Still confused? Let me help you to decide.

So should I create a free blog or self-hosted blog? I know that this is one of the hardest decisions for people who want to create a blog. I’ve heard this question so many times, so I’ll do my best to keep things simple:
  • Free blogging services: If you have no plans to blog more than a few months about something random, hands-down go with free blogging services. It doesn’t cost you a dime, you can signup within 5 minutes and start writing blog posts right away.
  • Self-hosted WordPress blog (recommended): If you have plans to dedicate more time and effort into your blog and make it successful at some point, start with a self-hosted blog from day one. All the successful bloggers I personally know are using self-hosted blogs on their own domain names. You’ll have no limits, it’s a MUCH better option.
Drawbacks? It’ll cost you some money. Domain names (www.YourNewBlog.com) are around $10 / year and web hosting is roughly $3 – $5 / month.
However, choosing one or another is totally up to you.
Read More...

Choose a blogging platform – WordPress

By 10:43
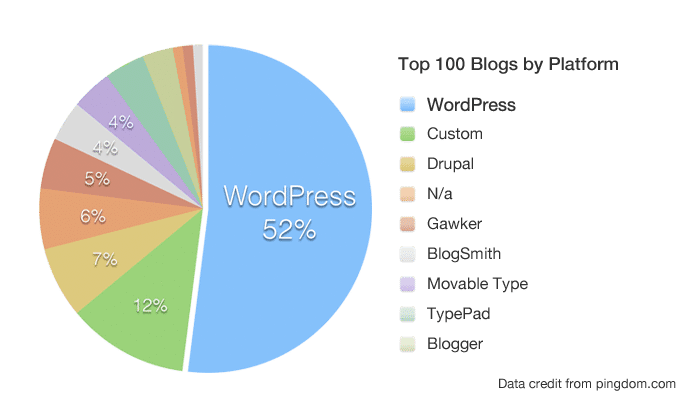
There are a lot of different blogging platforms to choose from: WordPress, Tumblr, Blogger and many Top 100 blogs by Platformmore. However, given that there are over 72 million active users using WordPress today, it’s clear which platform is the boss. Even my own sites and blogs are built with WordPress platform. Here’s why:
1) It’s FREE for everyone to use.
2) It’s super easy to set up.
3) It’s secure; WordPress are always updating their software and keeping everything sound and secure, so there’s rarely a worry of having your blog come under hacking attacks. No wonder Sony, NASA and even university blogs are using WP.
4) There are hundreds of free themes and plugins that add more functionality to your blog, from contact and subscribe boxes to plugins that improve blog performance and more.
While the other blogging platforms are generally all pretty great, nothing in my opinion has ever come close to matching the freedom and customisation options that WordPress offers. So without a doubt, go with WordPress.
HOLD UP! You don’t need to install nor download anything at this point. I’ll show you this in a minute, but first…
Read More...

Choose your blog topic (… and meaning).

By 10:43
What to blog about?

Finding a niche, topic or category is ESSENTIAL for your blog. Otherwise, you’ll fail from day one. Believe me, I’ve mentored hundreds of beginner bloggers who all wanted to make it work, but failed since they didn’t choose a blog topic.
Here’s a simple rule I usually suggest: Choose a topic that you’re INTERESTED in. If you KNOW more about something than 99% of the rest of people, go with it. That way you can write about something that you’re passionate about.
If you don’t know what to blog about – don’t worry. You can still create a blog (you can figure it out later).

Here are some tips for you (when you click, it expands)
Read More...

Wednesday, 24 June 2015

How to Identify a Scam Website in Pakistan?

By 03:10

How to Identify a Scam Website in Pakistan?    

Internet is without any doubt a great invention and has given a lot to the humanity in terms of providing free information and opportunities for everyone regardless religion, language, country and cast. But as every invention has two sides, the one which people positively use for better serving the humanity and the another one is using it for negative activities. And the same thing is happening with the internet since its invention. People use it for researching and publishing their stories, and also to buy any stuff online, companies use it for selling their products, for providing services and a lot more. While, there are a few number of people who use internet for bad activities such as making some people fool and getting money from them. There are hundreds and even thousands of scam websites which takes money from people for jobs or income and then don’t give that money back. Some scam websites offer online jobs and home-based work and when the users reach their withdrawal amount, they refuse to pay the payment, and don’t do a fair business with its customers.
scam websites alert
So in this article we’ll be addressing a very common issue called “Scam Websites” or it might also be called “Fraud websites”, I’ll give you some tips to identify whether a website is “Scam” or “real”. So after reading this article, its your turn to identify the website you are going to do a business with or a deal with. Alhamdullillah, I have common sense myself and have never been scammed by anyone on the internet. And I’ll share the same measures with you which I use for checking a website and its credibility.

How people are scammed on the internet?

I received many emails, SMS and comments from our readers and some people who were complaining that some sites or a site scammed them and didn’t refund their money back. They mostly complain about their own money which was taken from them by “Scam websites” in order to provide them benefits and income, but there was neither income nor the invested money was given back. My answer to all those brothers and sisters is; why didn’t you ask someone for the reality and credibility of that website before investing your money there?, if you quietly did everything yourself and then you came to know you’ve been plundered then why you are asking people to get your money back from them, but at the time you were blindly investing your money, you didn’t ask anyone.

How to Identify a Scam website?

So here I come with few indications that are given by the “Scam websites” themselves, which are common in each and every website who are doing bad business with people. Here is the list of those common indications which you must consider in order to identify whether the website is scam or not? and should you invest your money or not:
  • Mostly scam websites offer “Guarantee” on everything, even they offer you lifetime money back guarantee
  • Scam websites mostly don’t have the real owner or contact numbers on their websites
  • Scam websites mostly try to hide their country and office address
  • Scam websites are always designed with “colors” and “Shiny” words, so that one may be inspired by them easily
  • Most of the scam websites tell you a shortcut for getting success or making money online
The above are few indications which you can use to identify a scam website or a fraud company, but there are a lot more to be pointed out when making a decision about the reality of a website on the internet.
Some websites offer services like SEO, Web Designing, Web Development and making money online etc in Pakistan. So if you want to get any of their services then kindly first check their own ranking and reputation as well as their history in the market.
You can check anyone’s ranking using different tools such as Alexa.com, who.is and many other tools. You should also check the projects they have already done and ask their customers for more satisfaction. If their customers told you about their services and customer support that would be an extra information for you before making any decision.
If anyone is just offering you services they have not expertise in then it might be harmful for you in the future. you might lose your money as well as precious time.
My message is particularly for Pakistani users who are mostly being affected by scam sites because they mostly don’t consider the factors which I mentioned above. So be aware and do a comprehensive research before you join any website that asks you for investment.
Last Thing: 
In USA and western countries even the governments are taking care of people and making them aware from losing their money. So you can take a look at this FBI’s page for increasing your knowledge more and more in order to be on safe side:
There are however some other websites which can help you to detect how a website is secure and reliable, so you may always use these websites to check more about the website you are going to do any business with:
Note: All the above information provided by us is just for common awareness about identifying the spamming and fraud websites, we have not mentioned any particular website or company, its just for general purpose to identify a website or company on the internet.
Let me know in comments if you have further questions or you want to add any suggestions to this post, so people may get more help from your suggestions. Thank You!
Read More...

How to Build an Efficient SEO Strategy?

By 03:09

How to Build an Efficient SEO Strategy?

SEO stands for Search Engine Optimization. It is one of the internet marketing strategies that is very effective for your website and very important for your online business. Through good SEO strategies you can improve the rank of your website and keep your website in the first page of Google. However, it requires a lot of research and efforts to keep your website’s ranking up to date, you’ll need to do something extra in order to keep balance between your website content and the marketing techniques. However, we’ll be sharing some simple tips with you for boosting up your ranking in very short period of time by doing real efforts yourself. The tips being shared on this page are not that extraordinary, but these are in fact the core ones for your website’s SEO, which you must keep in mind before moving forward to do some advance things.
seo-stragegies
There are many SEO strategies that you can follow to increase the rank of your website in the eyes of Google and stays in the first page of Google search. Let’s discuss some of key points that will help you to make a powerful strategy for your website.

#1. Website Design

Design of your website matters a lot. Have a little attention towards design of your website. Make sure that your website attracts the people not create difficulty for customers of your website. Select a very eye-catching and decent color for your website to attract the users of your website from different communities. Everyone who visits your website must easily navigate to any part of your website, so they’ll not leave it, but will spend sometime. And it decrease the bounce rate.

#2. High Quality Content

After the design of your website let’s come to the content of your website. Content of your website is very important to rank up your website in Google. Content is the one that takes people towards your website and enforce them to stay on your website for a time. Always try to post the content which is very informative, unique and up to date.If you provide a good quality content on your website and ensure this in your every post than you might get subscriptions from your customers. This increases your website’s traffic tremendously. Higher the number of subscriber shows that you have a very powerful content on your website which users like the most. Google also consider this popularity of your website among the users to rank up your website. Make sure that content on your website must be SEO-enriched that serves a very useful purpose to readers of your website.Keep in mind that Google continuously changes and enhances its searching algorithms to get the high quality websites on its first page.

#3. HTML of your Website

HTML tags of your website helps Google to move through the content of your website efficiently and quickly. Google also ensure that either your website is relevant to your keywords or not by HTML tags of your website. HTML tags also organize the content of your website. It is very clear now that you should work hard on HTML tags of any page of your website, specially the most important tags i.e. HTML meta tags and heading tags.

#4. Relevant Keywords

Relevant keywords are those which are most appropriate and represent the topic of your website. Keywords are the word or term which user enters in Google search and then Google moves through different websites and fetches the websites having those  keywords and shows in the search result. Keywords are the ones which actually bring customers to your website from Google. Make sure that you use your targeted keywords within the name of web pages, meta tags, descriptions and headings of your website.

#5. Social Media is Important Today

After doing all above, I’d also suggest to not forget social media networks i.e Google+, Facebook, Twitter, Pinterest and LinkedIn, because by using these social networks you can not only drive tons of traffic towards your website, but also increase your search engines ranking. Force people to share your content over social media with their friends. The more people share your content, the more will be better your ranking. Give more importance to Google+ and increase your circles over there for better visibility in Google searches.
Let us know if you have got any questions regarding your SEO strategy or something related to your blog/website. We’ll be happy to answer your all questions only using below commenting system. Thanks for reading!
About the Author:
Ghulam e Mustafa is a well experienced in web design, development and SEO. He shared about making an effective SEO strategy, you can find him @ his website on www.webmasterseye.com
Read More...

How to Improve Page Rank of your Website?

By 03:08

How to Improve Page Rank of your Website?


Just yesterday we were shocked by Google when we saw a new Pagerank Update in December 2013. This was a shock because Google had not updated its Page Rank toolbar since February 2013 (as usually it get updated after every 3 months), and its now been 10 months we didn’t see any updates from Google. But it just happened yesterday on 5th December. Everyone () is now feeling relaxed after having this update seen, because many of the pros and experts were even saying that there will be no PR update in 2014, this included Mr. Matt Cutts who is the Head of Google Web Spam (Mattcutts.com/blog). But now the fact has been disclosed by Google itself that Page Rank still exists and will be in the future. So now we should work hard to improve our site/blog’s page rank before next PR update which might be probably after three months in March 2014. So here via this post, I’ll discuss some particular tips with you regarding improving PR of your site.
Google-Pagerank
These are few tips that will help you in improving your site’s Page Rank over the next 3 months before next PR update, so you may start working over your site off-page SEO in order to be having a good PR next time. The tips are ordinary which you might have already read on other sites, but I’ll try to put something extra on it, so you can easily understand it and apply it over your sites right now.

#1. Write Quality & Unique Content

This may not sound good to you, but undoubtedly quality and unique content can improve your PageRank rapidly, this is because Google gives priority to quality content and its authors, if you remember .Edu sites which have great PRs without having enough backlinks, and backlinks are considered the backbone for getting a high pagerank. So then why the .Edu sites get high PR from Google, also I’ve seen authors who have just written great content and without a single backlink they got PR3 and PR4 from Google just because their content/articles were up to the mark. Moreover, your quality content might be shared by others and also linked by others, so you get free backlinks for your content from everywhere.

#2. Start Guest Posting Today

This is a genuine method for improving your PR on early basis, you need to write quality content for other websites in your niche, this way you’ll get one or two backlinks for your site from every blog where you’ve guest posted. Guest posting is a job something like you are cooking eggs for someone else, but in return you are given some respect in terms of one or two backlinks which may help you in upcoming Google PR update, you should find the websites/blogs related to your topic and request them if you can write for them. In the starting try to write for PR2 blogs and then try to write for PR3,PR4 and PR5 blogs/sites. So your every guest post will bring a lot of visitors back to your site as well as a permanent backlink for improving your PR.

#3. Blog Comments & Social Media

You can’t be lazy, you must at least take out 30 minutes everyday to go to your favorite blogs and comment there, you need to at least leave 20 comments daily on different websites which are related to your topic, so this way you’ll get some positive links which will help you improving your own PR over next Google Update. Moreover, try to at least create profiles on Facebook, Twitter, Pinterest, Google+, LinkedIn, Stumbleupon, Digg and Riddit.com. These all social networking sites are free to join and you can just add your site/blog’s URL in your profile over there. This way you are creating some great backlinks forever. Don’t be late, just go for it.
Don’t miss these posts: 

#4. Don’t be selfish, Help someone on Forums & get response

If you try, there are many helpful forums around the web, where you can find threads on every topic, so you can join and you must join these forums in order to create backlinks for your site. Not only you will improve your PR but you’ll also help people there. And of course, you’ll learn something new over each forum you join. Every comment or reply you leave over these forums, you’ll get a backlink for your own site. So this is not a bad deal, go for it. Just write in Google a keyword like this “Best forums to join“.

#5. Create something and see a BOOST

This is something like a secret, you probably have visited a website spelled “btemplates.com” which is a resource for free blogger templates, and if you check it on Alexa.com then you’ll be surprised to see that this site is having 12000 backlinks, which is a huge amount. However, the free templates shared by Btemplates are not mostly created by themselves, but despite that they have thousands of free backlinks from different sources. So if you create a simple blogger template or a beautiful blogger widget then you can easily get hundred and even thousands of backlinks. You can simply convert WordPress themes to Blogger or you can just create a simple blogger widget which can attract people, you just need to add your blog/site’s link in the footer of that template/widget and every person uses that will give you a free backlink from their site. And this way you’ll create more backlinks in very short time. I’ve seen even kids are doing this and getting thousands of links.
Also keep this in mind
This is the last tip for improving your PR over next G-Update, you should always interlink your older posts with the new ones you write every single day or anytime you do. Just find some keywords in your recent post, and interlink them with relevant posts you already published on your site/blog, this is actually called interlinking. So by using this way you can also improve your Page rank and if you want to improve the PR of your blog’s Home Page more rapidly then just use your home page link most often in posts with relevant keywords and see the boost in next Google PR update.
We got PR2 this time, but Inshallah we’ll get either PR3 or PR4 in upcoming Google PR update, so stay tuned for more tips and share your experience and what did you get over this page rank update from Google? share your views in the comments. Thanks anyway, for reading this long post.
Read More...

How to Make Money with BuySellAds

By 03:07

How to Make Money with BuySellAds

In my last video series, we discussed about “Applying for Adsense Account in Urdu“. But there is one more great platform for content creators called “BuySellAds” which is not designed as Adsense, but it’s more powerful than Adsense in terms of everything. Adsense is a PPC (Pay Per Click) ad network which pays publishers when the ads are clicked by the visitors, while BuySellAds (BSA) is much different than Adsense. BSA is a direct banners ad network which will allow you to insert blank Ad spots inside your blog/site and whenever an advertiser will be interested to display an ad over your site, he/she will directly contact BSA to show their interest in your site, and after that you’ll accept the ad. The ads are displayed on your site for a minimum period of 30 days regardless any clicks or impressions. So here you have an advantage that you’ll get a sponsor for the whole month, and the payment will be confirmed.
buysellads approval
BSA works as a Gateway between the publisher & the advertiser, You’re a publisher who has a website & content to monetize, and an advertiser is looking for a website to offer their advert, so BSA will find advertisers for you and you’ll be paid on monthly basis. However, BSA takes some of the service charges from your earning, but don’t worry, its very low and less than Google Adsense.

How Much can you earn from BuySellAds?

There is no exact figure for earning with BSA, but it all depends on the traffic you have on your website. And more importantly, if your site is approved by BSA, because BSA doesn’t easily accept new websites. So you have to work hard to be approved by BuySellAds.com. Once your site is approved, you can instantly show their ad spots on your site. Usually a website with 50K monthly impressions earns up to $500 per month from BSA. So the more visitors you have, the more earning will be there.
Moreover, the topic of your site also matters in terms of earning with BuySellads. Topics related to technology get high paying advertisers and they make more money than celebrity, sports & other general topics. Make Money Online, SEO, Web Development and web designing topics are most high paying for BSA advertisers.
Read this one also: Alternatives to BuySellAds

Criteria for getting an Approval from BSA?

You can create your account at BSA without any requirements, but for inserting BSA ads, you must have at least one website approved by them. So for approving your site, you’ll first have to submit that for review. Your website must meet their minimum criteria in order to be easily approved by them. And here is the simplest criteria before applying for BSA:
  • Your site must receive 30,000 or above monthly impressions
  • Your site must be in English
  • Your site must have a professional looking design (Very important)
  • Your site must have at least 50 or above posts/articles
  • Your site must be at least 4 months old (For new site approval)
  • No hacking, no cracking, no pornography, no adult content, no plagiarism
The above mentioned points are must before you submit your website for a review. However, you must read their criteria listed on their own website before applying.
Now here is the video tutorials series for this whole procedure in Urdu language, which I just created for you. These video tutorials are the part of my upcoming “4 Ways to Make Money online in Urdu” course, which is on the way and soon will be released in DVDs, but you can enjoy the free videos here:
Make Money with BuySellAds video 1 in Urdu
Make Money with BuySellAds video 2 inSo after watching the above videos, I hopefully can say, you have understood how does BSA work basically. But one thing is sure that if you got an approval from BSA than you can make more money with it. Even it’s a bigger thing than Adsense.
If you have any questions regarding this post or you want to add some more tips then kindly use our comment section.
Read More...

Best SEO Link Building methods in 2014

By 03:05

Best SEO Link Building methods in 2015

Link building is a must part of any SEO project. I must say ranking your website is incomplete without doing link building. your website’s link building is done in an appropriate way. If you are confused about what are the best SEO link building methods then not to worry, we would here give you an updated overview of the best strategies. I am sure by following these easy to understand link building methods, you be able to enjoy the good blog ranking because Google continuously updates its algorithm strategies and this is why an SEO project handler should keep in mind the following link building strategies and methods.
seo-link-building-2014
Before going to know about the tips, have a look at following SEO tutorials: 

#1, Good Content matters:

I don’t know if you have noticed it or not but the quality of contents and articles is the key to success for every SEO project. It is a tip of SEO strategy that you should always create well engaged content and articles for your website. The importance of good and quality content can not be ignored in SEO link building, because it would become the reason for you to get maximum traffic from social media and other networks.

#2, Quality Info-graphics:

Google always prefer the blogs to rank higher which have best and quality info-graphics. For this reason, you have to create top notch and valid info-graphics for your blog or website. Try your level best to create best info-graphics with valid data source so that your web site gets ranked higher. Another must remember thing is that you should embed your code in a way that no one else can track or hack it. This would tremendously increase your blog ranking because it is a very effective link building method.

#3, Directory Submissions:

Google prefer the blogs and websites which have used quality directories in order to submit their contents. Thus, directory submission is yet another very effective SEO link building method. The blogs which implement quality directory submission strategies, usually get very good PR. So you need to use the web directories as per your blog niche and submit it as much as you can.

#4, Guest Posting:

Guest posting is yet another very efficient SEO link building method. Try you get information about the best websites or blogs with PR 1 to 3 in order to write guest posts at. Within every article / post you write at such blogs, you can insert your own website’s link in order to get direct organic traffic. Almost all the bloggers and SEOs make use of this link building ideas because so far it has been a proven effective method to rank the websites. It is due to the reason that Google and other search engines crawl such websites better and easier so their rankings go higher and higher.
But make sure, you guest post for quality blogs and you know the website owner better for whom you are doing guest posting, because recently Google’s head of web spam (Matt Cutts) hinted to not do this practice everywhere for the sake of backlinks, but yeah, it’s still a great method to create backlinks but with authority and interaction.

#5, Using Social Media Networking Websites:

You should try to use as many social networking communities and forums in order to build quality links for your website. This can be done when you create both personal and professional profiles at facebook, twitter, linked-in, google+ and other social networking websites, and once the profiles have been created then the next step is to join the comments and communications and leave your website link over there. The more you input your efforts in this regard, the better organic traffic would be generated to your website, and thus the better would be its ranking.
All these methods are quite easy and once you get to know their significant role in ranking the website higher, I am sure you wouldn’t miss the chance of following them so that quality links are built for your website. So how did you like my post? Please let me know with your comments.
Read More...