Tuesday, 29 September 2015

Add Cute Custom Facebook Like Box To Blogger

By 10:06

How To Add a Custom Facebook Like Box to Your Site
Facebook Like Box is very useful widget to show visitors the authority and love of the people for his blog. Facebook offers a simple Like Box plugin that you can easily integrate into your website But the default Facebook like box is not having good look at ugly all. This tutorial will show you How To Add Cute Custom Facebook Like Box using CSS To Blogger. Facebook Like Box is the best way to get more fans on Facebook. A Fan Box allows great attract your Blog more visitors or readers to like your Facebook fan page not leaving the like go here. you don't need to do any think you only need to copy and paste the code. Im Sure that this Cool Customize Facebook Like Box With CSS widget attracts your facebook fans increase the count of Likes.


How To Add a Custom Facebook Like Box to Your Site


Now let's start adding it...

Step 1. Login to Your Blogger Account.Go to your Blogger Dashboard.Click on Layout tab from left pane and click on Add a Gadget link.


Blogger Tips And Tricks|Latest Tips For Bloggers

Step 2. After click on Add a Gadget link A pop-up box will open now
with many gadget list, Choose HTML/JavaScript from the gadget options by clicking the blue plus sign for that gadget.


Blogger Tips And Tricks|Latest Tips For Bloggers

Step 3. Select 'HTML/Javascript' and add the one of code given below.

Step 4. Now Click On Save 'JavaScript' You are done.
Read More...

Die Blogspot-Grundlagen: Das Dashboard

By 10:03
Blogger: das Menü

Auf der "Startseite", Ihrem Dashboard, finden Sie in der linken Menüleiste alle wichtigen Funktionen:
  • Der erste Punkt "Neuer Post" führt Sie direkt zum Textfeld für einen neuen Blogeintrag. Mehr dazu im nächsten Absatz.
  • Posts: Hier finden Sie alle Blogeinträge in einer Liste und können ältere Posts bearbeiten, löschen und von der Webseite nehmen oder sich die Zugriffszahlen der einzelnen Artikel ansehen.
  • Seiten: Fügen Sie verschiedene "Seiten" ein, können Sie Ihren Blog in Abschnitte gliedern. Der Unterschied zwischen "Seite" und "Posts" besteht lediglich in der Anordnung: Seiten sind nämlich (je nach Layout) im linken oder oberen Menü angeheftet.
  • Kommentare: Einzelne Blogeinträge können von Usern kommentiert werden. Die Kommentare müssen Sie hier freischalten.
  • Google+: Ihr Blog ist mit Ihrem Google-Plus-Account verknüpft. Alle neuen Beiträge werden dort automatisch gepostet, dies können Sie hier jedoch auch deaktivieren.
  • Statistiken: Wer hat wann von wo mit welchem Gerät Ihren Blog angesehen? Unter "Statistiken" finden Sie es heraus. Wird der Blog fast nur von Smartphones angesehen, sollten Sie die Inhalte auch für die mobile Ansicht optimieren.
  • Einnahmen: Gute Blogs sind eine kleine Geldquelle, zumindest wenn Sie Werbung schalten. Wie Sie dazu vorgehen, lesen Sie hier.
  • Layout: Menüs, den Header und viele Gadgets für Ihren Blog können Sie hier ändern. Tolle Features von Facebook, twitter und Co stellen wir Ihnen in den nächsten Absätzen vor.
  • Vorlage: Die Vorlage konnten Sie bereits bei der Erstellung des Blogs auswählen – jetzt können Sie dies noch einmal ändern und ins Detail gehen. Schriftart, Farben, Hintergrund und auch das HTML-Skript des Blogs ändern Sie in diesem Abschnitt.
  • Einstellungen: Einen Vertipper im Namen können Sie hier ebenso leicht ändern wie die Blogbeschreibung und die Blog-URL. Zudem bestimmen Sie hier die Anzahl der Posts auf der Startseite, nehmen Einstellungen zu den Kommentaren vor und können die Blog-Beschreibung für Google eintragen.
Read More...

Tutorial: Mit Blogspot einen neuen Blog erstellen

By 10:02
Blogspot-Tutorial

Als erstes müssen Sie natürlich einen Blog erstellen. Haben Sie dies bereits getan, können Sie zum nächsten Abschnitt springen.
  • Melden Sie sich bei Google an oder erstellen Sie einen neuen Account. Anschließend müssen Sie Blogger öffnen.
  • Dort erstellen Sie über "Neuer Blog" eine neue Website, für die Sie noch einen Hintergrund und ein Layout auswählen müssen. Beides können Sie später jedoch wieder ändern.
  • Geben Sie noch einen Blog-Namen ein und klicken Sie auf " Blog erstellen"
Read More...

Sunday, 27 September 2015

Privacy and permissions

By 10:51
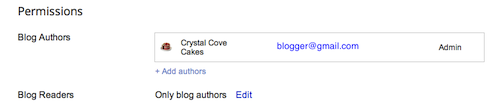
By default, your blog is completely public, and can be read by anyone on the internet. However, if you want to keep it private, you can do that, too. You can change these settings on the Settings | Basic tab.
Permissions and Privacy
  1. Under the 'Blog Readers' section, you'll probably see 'Anybody' selected as the default. When you change this to 'Only these readers,' you'll get an Add Readers button.
  2. Click the Add Readers button and then enter the email address of a person to whom you'd like to grant access to your blog. To add multiple people, separate their addresses with commas.
  3. For each address entered, the Google Account associated with that address will be given access to view your blog. If an address is not associated with an account, that person will receive an invitation email with a link allowing them do one of three things:
    • Sign in to an existing account.
    • Create a new account.
    • View your blog as a guest (no account required).
Read More...

Customize

By 10:50
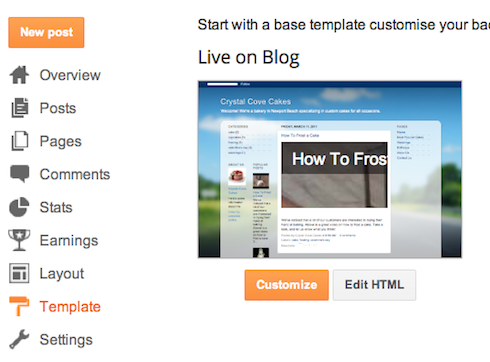
Your template is a fun way to customize your blog. When creating a new blog, you're first asked to choose a default template, this is the basic design of your blog. You can choose from many templates for your blog; simply pick the one that best fits your needs.
Template" Once on the Template tab, you can either click on the orange Customize button to get started with our easy-to-use WYSIWYG (“What you see is what you get”) template designer, or choose one of our many default templates. If you’d like to edit the HTML of your blog, just click the gray Edit HTML button.
In addition, you can customize your blog's design using our intuitive drag-and-drop interface. You can also add powerful gadgets such as slideshows, user polls, or even AdSense ads. If you want more precise control over your blog's layout, you can also use the Edit HTML feature. To edit your blog's layout, follow these steps:
  1. Click Layout from the drop-down menu on your dashboard below the blog you would like to customize.
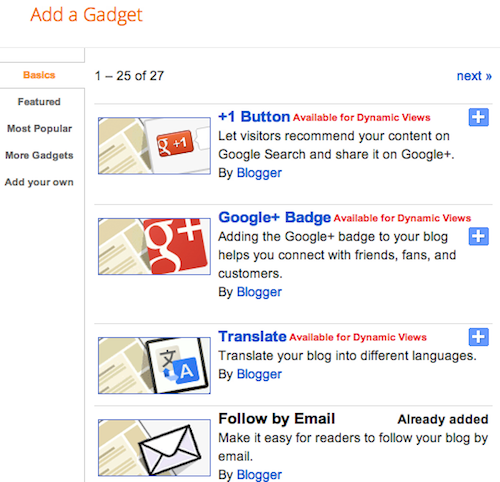
  2. From there, click Edit to edit existing gadgets, or Add a Gadget to add new ones.
  3. To add a new gadget after you've clicked Add a Gadget, simply click the plus sign next to your desired gadget. You can choose from gadgets by category, or search for a specific gadget in the top right of the pop-up window.
  4. add_gadget
  5. Once you've added the necessary information to your selected gadget, click the orange Save arrangement button. Your layout changes will appear instantly.
Read More...

Write your post

By 10:50
Once you've signed in to Blogger, you'll see your dashboard with your list of blogs. Here's what you need to do:
  1. Click the orange pencil icon to write a new post, and enter anything you want to share with the world.
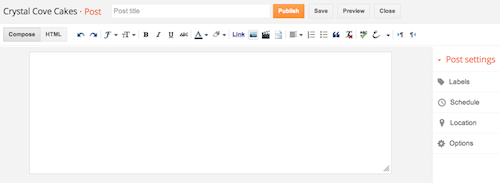
  2. Next, you'll see the Post Editor page. Start by giving your post a title (optional), then enter the post itself:
    New post
  3. When you're done, click the Preview button at the top to make sure it's ready to go, and then click the Publish button to publish your post.
Back to top

Add an image

You can add an image from your computer or the Web to your blog. Click the image icon in the Post Editor toolbar. A window appears prompting you to browse for an image file on your computer, or enter the URL of an image on the Web.
Once you've selected your image, you can then choose a layout to determine how your image will appear in your post:
  • The 'Left', 'Center', and 'Right' options allow you to customize the way your blog text will flow around your image.
  • The 'Image size' options will determine how large the image will appear within your post.
Click UPLOAD IMAGES to add your image, and then click DONE when the notification window appears telling you that 'Your image has been added.' Blogger will then return you to the post editor, where you'll see your image ready to be published to your blog.
You can also publish images to your blog using your mobile device, Google's free photo software Picasa, or a third-party service like flickr.
Back to top

Add a video

To add a video to your blog post, click the film strip icon in the Post Editor toolbar above where you compose your blog text. A window appears prompting you to 'Add a video to your blog post.'
Click Browse to select the video file from your computer that you'd like to upload. Note that Blogger accepts AVI, MPEG, QuickTime, Real and Windows Media files and that your video must be less than 100MB in size.
Before uploading your video, add a title in the 'Video Title' box and agree to the Terms and Conditions (you'll only have to do this the first time that you upload a video with Blogger). Then click UPLOAD VIDEO.
While your video uploads, you'll see a placeholder in the post editor showing where your video will appear. You'll also see a status message below the post editor letting you know that your upload is in progress. Depending on the size of your video, this usually takes about five minutes. When it is complete, your video will appear in the post editor.
Read More...

Blogger Getting Started Guide

By 10:49

Dashboard


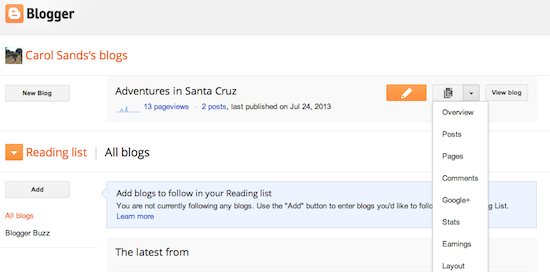
Your Dashboard, as always, is your starting point. This is where all your blogs are listed, and you can click on the icons next to them to perform various actions on each blog, such as:
  • Writing a new post: Just click on the orange Pencil icon on your Dashboard to access the Post Editor.
  • Viewing your posts: The gray Post List icon will take you to a list of your published and drafted posts for a specific blog.
  • Catching up on your favorite blogs: Below the list of your own blogs, you’ll see a list of the blogs you follow with an excerpt from their latest posts.
  • Everything else: Check out the drop-down menu next to the Post List icon for a quick link to:
    • Overview
    • Posts
    • Pages
    • Comments
    • Stats
    • Earnings
    • Layout
    • Template
    • Settings
Note that the Earnings tab will only show if AdSense supports your language.
Back to top

Overview

Overview
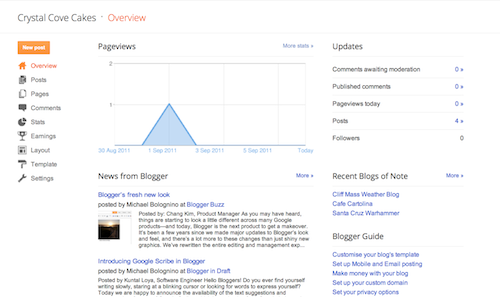
On the Overview tab, you can see your blog’s activity, news and tips from the Blogger team, and recent Blogs of Note.
Read More...